Treatment During Construction
Chemical treatment of the soil around or under the foundation of buildings serves as one of the most important means of isolating a building from termites; it provides protection from termite attack for many years. Treatment is most effective when done before and during construction of the foundation and should be used in conjunction with good construction, not as a substitute for it. It is particularly important when using concrete slab-on-ground construction.
Factors Affecting Termiticide Application
The soil type and its moisture content affect the penetration of pesticides. A soil fill accepts treatment best when it is damp, but not excessively wet or dry. If the soil is excessively wet, there is a chance of runoff, and the chemical will not penetrate the soil. In frozen or excessively dry soil, pesticide emulsions are repelled and puddling occurs, resulting in poor penetration and distribution of the termiticide. Check the label, most termiticide labels prohibit applications to be made into saturated or frozen soil.
Mechanical disturbance of treated soil breaks the continuity of the insecticide barrier and increases the possibility of termite penetration. The treatment of fill under slabs extends probably less than 2 inches deep, with the majority of the insecticide being in the top 3/4 inch. Therefore, very little disturbance to the treated soil can be tolerated. A freshly treated slab-foundation site should be protected with a polyethylene sheet or other waterproof material, unless the concrete is to be poured the day of the treatment. This protects the treatment from rain and evaporation. The final treatment on the outside of foundation walls should be done after all grading and other soil disturbances have been completed.
A termiticide is stable once it dries in the soil. Because the most commonly used termiticides are quite insoluble in water, leaching is not a problem. However, there is a slight risk of contaminating a well or other water supply if insecticides are applied to nearby soil that either contains layers of gravel or tends to crack severely during periods of drought. In these situations, the soil should not be treated with chemicals.
Methods of Application
The goal of applying a termiticide to the soil is to create an uninterrupted chemical barrier between the wood in the structure and the termite colonies in the soil. For this to be effective, the insecticide must be applied thoroughly and uniformly to block all possible entry points for termites. Treatment should be carried out around all pipes, utility conduits, foundations, and footings that make contact with the soil. The specific application procedures will vary depending on factors such as soil type, grading, the water table, the presence of drainage tiles, and the location of wells. Additionally, the design of the structure, the location of the termite colony, the severity of infestations in the area, and the behavior of the termite species must also be taken into account. The key principle in termite control is to prevent termites from moving between their nests in the ground and the wood in the structure. If any part of the structure remains unprotected, termites may still find a way to enter.
The rate at which the insecticide is applied will depend largely on the results of your site inspection. This inspection provides essential information about the structure that will inform the application plan. The plan will detail where and how the termiticide will be applied. Three common methods for applying termiticides to soil include broadcast spraying, trenching, and rodding.
Broadcast Spraying
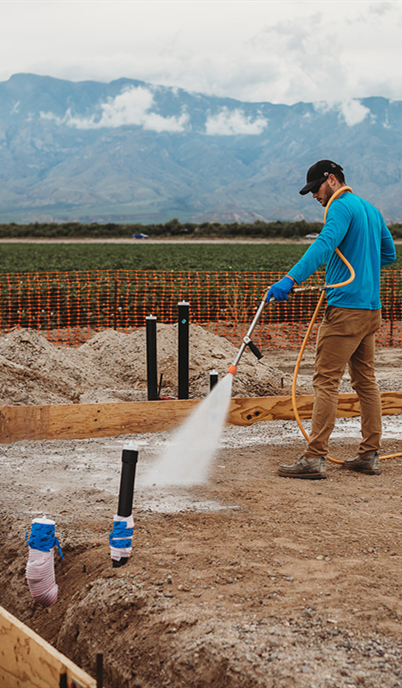
A low-pressure broadcast spray may be used to apply termiticides as a preconstruction treatment only before slabs are poured. There are several other points to remember about broadcast spraying:
a) Use low nozzle pressure of 25 psi or less,
b) Do not treat the entire crawl space unless covered with untreated soil or barrier (see termiticide label)
c) Do not treat areas intended for use as plenums.
Trenching
Trenching involves digging a narrow trench and then flooding it with a measured amount of insecticide. The trench must be right next to the face of the foundation wall or the masonry-work footing of any supporting posts or piers. The trench may not extend below the top of the footing of the foundation wall. The termiticide may be rodded into the soil at the bottom of the trench in addition to being mixed with the excavated soil as the soil is replaced in the trench.
Trenching varies with soil type and moisture. Some people suggest digging a shallow trench and then rodding the soil below to reach the depth of the footings. The trench should be slightly deeper next to the foundation so that the chemical flows against the foundation instead of away from it. On an incline, the trench is constructed in a stair-step fashion to prevent the termiticide from flowing down the incline. In wet or tightly packed soils, it is difficult to obtain the needed penetration with the trenching method. Sandy or loose soils can be treated satisfactorily under normal circumstances.
Apply the prescribed label rate of the termiticide emulsion for each 10 linear feet of trench for each foot of depth from grade to footing along the entire length of the trench. Be sure to treat the soil thoroughly as it is returned to the trench. Break up lumps and clods of soil and treat every few inches of depth as the soil is being replaced.
In general, soil and termiticide are mixed in the following manner: After the soil is removed from the trench, some of the termiticide, but not all, is poured into the trench. Some, but not all, of the soil is then backfilled into the trench and mixed thoroughly with the termiticide. Continue alternately adding termiticide and soil, and mixing thoroughly, until the trench is filled. The objective is to obtain even treatment of all the soil in the trench, so take care to combine termiticide and soil in the proper proportions as you fill the trench. Trenching should be done by two people, one to apply the termiticide and the other to add the soil to the trench and mix it with the termiticide. Both people must be certified applicators.
If you think that a foundation may leak if termiticide is poured into the trench, you may spread the excavated soil onto a tarp and add termiticide directly to the soil on the tarp. Again, only treat some of the soil at any one time. Mix it thoroughly with the termiticide and backfill it into the trench. Proceed until all the soil has been treated and placed back in the trench. When the trenching operation is completed, cover the treated soil with approximately 1 inch of untreated soil; this will reduce risk of exposure of residents and pets to the treated soil.
Rodding
Rodding the soil is considered by many to be the simplest method of application. The pesticide is applied through hollow steel tubes that are inserted either vertically or horizontally into the soil. Typically, the rod is a pipe, about 1/2 inch in diameter and 4 feet long, with a handle and shutoff valve at one end. The other end is fitted with a perforated tip to disperse the liquid both laterally and downward.
To facilitate penetration of the ground surface, the soil can be moistened before inserting the rod. Once the rod begins to penetrate the soil, chemical flow starts, helping to guide the rod down to the 3 feet or more required to saturate the soil at the footings. Always move the rod slowly to allow the chemical to spread evenly. Never push the rod down and then bring it up; this could create uneven distribution. Apply the recommended label rate for each 10 linear feet per foot of depth up to the top of the footings.
The spacing of rodding will depend on soil conditions. Typically, insertion points are spaced every 12 inches, though they may be as close as 6 inches in clay and as far apart as 18 inches in sandy soil. The goal is to position the insertion points close enough to ensure overlapping of the application, leaving no untreated gaps. By angling the rod slightly toward the foundation, the flow of the chemical will be directed against it. The rod insertion points should be parallel to the foundation to ensure proper coverage.
Slab-On-Ground Buildings
This type of construction is best treated as a pretreatment. Soon after the gravel or dirt fill has been made and tamped, spray the soil with termiticide before the concrete slab is poured. Use a low-pressure (25 psi), coarse spray to avoid misting and drift.
Horizontal Barriers
Apply the label rate of diluted chemical for each 10 square feet over the entire under-slab area, and also under any attached porches, terraces, carports and garages where the fill consists of soil or unwashed gravel (Figure 1).
Apply the recommended amount of diluted chemical for each 10 square feet to those areas where the fill is washed gravel or other coarse absorbent material such as cinders.
Vertical Barriers
Dig a trench 6 to 8 inches wide along the outside of the foundation, including porches and patio. Where the top of the footing is more than 12 inches deep, large volumes of chemical are required. For proper application, make holes about 12 inches apart in the bottom of the trench to the top of the footing, using a crowbar, metal rod or grouting rod. These holes permit better distribution of the chemical by providing access to the soil at depths below the trench. The holes may need to be closer together in hard-packed clay soils than in sandy soils. Apply the label indicated rate of diluted chemical for each 10 linear feet of trench for each foot of depth from grade to footing. Refill the trench with the excavated soil, mixing it with the pesticide as described earlier (Figure 2).
Hollow Block Foundation/ Voids in Masonry
The general procedure is to drill holes in the blocks at least 1 to 2 feet above the footing or as close to outside grade level as possible but not above the top of an interior slab. Chemical should be injected to form a continuous barrier and every void should be treated. Apply the label rate of diluted chemical for each 10 linear feet of wall or foundation so that it reaches the footing.
Crawl Space Houses
Crawl spaces are low, less than 3 feet high, and usually have exposed soil. This type of construction is common in many parts of the country, particularly where basements are common. The exposed soil, short distance to floor joists and sills and unkempt nature make crawl spaces an ideal portal for termites to find and infest the wood in a structure and for swarmers to escape the nest. The termiticide selected should produce little or no odor; exposed treated soil in a crawl space can become a smelly nuisance.
Mechanical Alterations
Remove any pieces of wood left on top of the soil; contractors will often leave construction debris in crawl spaces. Capping the soil with a layer of concrete will prevent swarmers from emerging. Treat the soil before the cap is poured to form an effective barrier. The crawl space should be vented to help minimize moisture and odor build-ups. It is recommended that the total area of vents be equal to 1/150 of the total area of the crawl space. A crawl space with vents placed on at least two of the outside walls and close to the corners will have few dead-air pockets.
Soil Treatments
Treat the soil adjacent to the foundation walls by digging a trench 6 to 8 inches wide along the inside of the foundation (Figure 3). Apply the recommended amount of diluted termiticide for each 10 linear feet of trench per foot of depth from grade to the footing. If the top of the footing is more than 12 inches deep, requiring a larger volume of termiticide, create holes about 12 inches apart at the bottom of the trench, extending to the top of the footing. Use a crowbar, metal rod, or grouting rod to create these holes. This allows for better distribution of the termiticide by providing access to the soil at deeper levels. In hard-packed clay soils, the holes may need to be placed closer together than in light, sandy soils. After treatment, refill the trench with the excavated soil, mixing it with the termiticide.

For the crawl space, create a horizontal barrier by applying the labeled rate of diluted termiticide for every 10 square feet across the entire surface area. For areas where the fill is made of washed gravel or other coarse, absorbent materials such as cinders, apply the suggested amount of termiticide for each 10 square feet. If buried wood cannot be removed, inject the termiticide into the soil near the wood’s surface. Once the soil is treated, cover it with a layer of untreated soil or polyethylene sheeting. Ensure the sheeting is sealed to the foundation wall by weighing it down with untreated soil or gravel. Overlap the edges of the sheeting and seal them by covering with clean soil or gravel.
Next, dig a trench 6 to 8 inches wide along the outside of the foundation, including areas like porches and patios. If the top of the footing is more than 12 inches below the surface, use rodding to reach the top of the footing (Figure 3). Space the holes about 12 inches apart to ensure a continuous chemical barrier. For hard-packed clay soils, the holes may need to be spaced closer together, while for lighter sandy soils, they can be farther apart. Apply the correct amount of diluted termiticide for each 10 linear feet of trench per foot of depth from grade to the footing. After rodding the soil from the bottom of the trench to the top of the footing, refill the trench with the soil, thoroughly mixing it with the termiticide (Figure 4).
Full-Basement Houses
The application of a termiticide to a typical house with a basement is done in the same manner as that recommended for slab-on ground construction.
Soil around the foundation, piers, utility lines and load-bearing walls must be treated with termiticide by rodding or trenching. For normal soil and moisture conditions, when footings are 4 to 6 feet deep, dig the trench at least 2 to 3 feet deep. Apply the indicated quantity of termiticide for each 10 linear feet of trench for each foot of depth from grade to the footing along the entire length of the trench.
Where there are hollow block foundations or voids in masonry foundations, these should be treated with the appropriate amount of termiticide for each 10 linear feet of wall, at or near the footing. Overlap these patterns of application to make a continuous chemical barrier in the voids. The termiticide must be applied so it will reach the top of the footing.
Prior to laying the slabs, apply the termiticide with a low-pressure, coarse spray to the fill to create a horizontal barrier just as with the slab-on-ground house.
Special Note: If the concrete slab cannot be poured the same day, cover the treated soil with a waterproof cover such as polyethylene sheeting. This will protect the treatment from adverse weather.
Treatment of Existing Termite Infestations
Ridding existing structures of termite infestations, plus making them resistant to future infestation, is a major goal of termite control. Generally, buildings become infested because, during construction, little or no attention was paid to the preventive measures that would have made the structures resistant to termites. It is in such buildings that termites cause heavy damage each year.
To control termite infestations in existing buildings, observe the same principles that are recommended for the prevention of infestation during the construction of new buildings. That is, eliminate conditions that favor the development of termite colonies in the soil and conditions that permit the passage of termites from the soil to the woodwork of the building. This is important, because termites in the woodwork of a building die if they are prevented from maintaining contact with the soil or other sources of moisture.
Inspection
Each job should start with a thorough inspection. Such an inspection and record keeping will help you avoid legal entanglements, provide proper explanation of the needed work to the owner, help you price the job properly and help you or your employees do the job properly.
For a proper inspection, you need a strong light, a sharp probing tool, a tape measure, coveralls, a hard hat, kneepads, graph paper and inspection sheets. A moisture meter may be helpful. Specially trained termite-detection dogs have been useful in locating difficult-to-find colonies. A sketch drawn to scale showing the structure’s ground area is very helpful in planning the work and should be kept in your files. It should show all details for treatment and should include the location and spread of the infestation found.
The inspection of both inside and outside walls for termite shelter tubes should be carried out carefully, particularly when the tubes are near soil or in basements or crawl spaces. Check for the presence of swarmers or their shed wings.
Tapping exposed wood by hitting along the grain is also necessary, particularly if foundation walls are of hollow-block construction. Termites frequently enter wood through the voids in the blocks and are very hard to detect. Soundings will tell you where the wood has been damaged or if the wood is easily damaged. If either occurs, probe further for tunnels or the brown, pasty substance called mastic that termites leave.
Many other pests, including insects and fungi, damage wood. You should be able to distinguish damage caused by termites from that caused by these other wood-destroying pests; this is essential if you are to correctly assess a situation and properly advise your customer.
Walls constructed of stone, concrete, cinder blocks, hollow tile or brick may develop cracks through which termites can pass to sills and other wood members. Carefully inspect such walls. Earth-filled porches and steps account for more cases of termite attack than any other building feature.
Check wood paneling and other wall finishings on basement walls, wood partition walls and other wood construction in the basement, which extends from masonry to the sills or joists.
Note plumbing and utility fixture entrances and passages through the basement floor and the foundation.
Determine the presence of wells, whether driven or dug, and their distance from the building.
Investigate and make records of springs, sumps, drainage tiles or anything which might be contaminated or transport pesticides away from the treatment area.
Even if an infestation is found, the inspection should be complete and thorough to ensure all points of entry and damage have been found. A light infestation may escape detection even with careful inspection.
Measure inside and outside to make sure that there are no hidden or blind rooms or double walls.
You and your customer should discuss the report and agree on a course of action. If chemical control is warranted, remember that termiticides used to prevent subterranean termite infestations may also be used to control existing infestations in buildings. The purpose of chemical control is to form vertical and horizontal barriers of treated soil between termites in the soil and voids in the structure. We will now discuss some ways of controlling termites by chemical treatment in existing buildings.
Again, many of the same principles recommended for preventing infestations apply to chemical control of existing infestations. In addition to controlling existing termites, you want to provide a continuous chemical barrier against future termite attack. Greater caution is required, however, because of the presence of plumbing, ductwork and electrical wiring, and because the building is probably occupied by people and/or pets. During application, you should have an assistant constantly checking for leaks in the basement or other areas where termiticides should not enter.
Slab-On-Ground Houses
Termite infestations in houses built with a slab on the ground present serious control problems. It is difficult to place chemicals in the soil beneath such floors, where they will be effective. Applications can be made by subslab injection or trenching or both. Treat along the outside of the foundation and, where necessary, just beneath the slab on the inside of foundation walls. Treatment may also be required just beneath the slab along both sides of interior footing and supported walls, along one side of interior partitions and along all crack and expansion joints.
One way to do this is to drill a series of vertical holes, about 1/2 inch in diameter, through the concrete slab close to the points where the termites are or where they may be entering. Space the holes about 6 inches away from the wall and approximately 18 inches apart to ensure a continuous chemical barrier of the underlying soil (Figure 5).
Do not apply termiticides until you have identified the location of heat or air conditioning ducts, vents, water and sewer lines and electrical conduits. Extreme caution must be taken to avoid contaminating these structural elements and airways. If termiticides were injected into
duct systems, the residents of the household may be subject to long-term inhalation exposure to the insecticides.
Another method of slab treatment is to drill through the exterior foundation walls to the soil just underneath the slab. You then introduce the chemical through these holes. This method, most often needed under bathrooms or kitchens, is complicated and requires the use of horizontal rods (Figure 6).
Take extra caution to prevent drilling into plumbing, electrical outlets or heating ducts that may be imbedded in concrete. Injection of termiticides into these areas must be avoided. For shallow foundations (1 foot deep or less), dig a trench 6 inches wide along the outside of the foundation wall. Do not dig below the bottom of the foundation. Apply the emulsion to the trench at the recommended label rate for each 10 linear feet and return the soil to the trench.
Structures with Ducts in the Slab
Applying a termiticide to an existing structure with intraslab or subslab air circulation ducts must be done with great care. Intraslab ducts are completely encased in the slab (Figure 7). The ducts of a subslab system rest on a vapor barrier, with the concrete poured on top (Figure 8). Take extra precautions when treating a structure with one of these systems; puncturing a duct or allowing termiticide to leak into these ducts results in serious problems. If a mistake is made, there are corrective measures. However, they are expensive and the applicator may never be able to alleviate the customer’s fears.


When inspecting for termites in a structure with air ducts in the slab, you should include some additional procedures. Try to obtain a diagram or blueprint of the duct systems. Determine what the ducts are constructed of and how tight the joints are. Make measurements of the depth, width and location of the ducts. Inspect the ducts carefully, using a mirror and a flashlight, for soil deposits and evidence of breaks in the ducts. Swarmers coming from the ducts also indicate a break in the integrity of the ductwork. Discuss evidence of breaks in the ductwork with the homeowner, as this may lead to termiticide leakage.
The termiticide needs to be applied beneath the slab, under or around the ducts. Special tools – subslab injectors – are made for injecting the chemical beneath the slab. They are available with a rubber seal that presses against the sides of the hole drilled in the concrete to avoid leakage up on top of the slab. The holes should be drilled carefully (Figure 9) and must not puncture the ducts. The chemical should be applied at reduced pressure to keep the chemical from being forced into the ducts. Rather than using a subslab injector, you may choose to apply the chemical by gravity feed for an additional margin of safety.

During and after treatment, check the ducts for signs of the termiticide. Turn on the heating system and check for odors. If you detect an odor, turn the system off and determine the source of the odor. Leakage in the ducts must be removed. If the odor is from the moist soil, it may persist for several days. The applicator must refer to the termiticide manufacturer for cleanup and odor-deactivation procedures.
Raised Cement Porches, Terraces, Entrance Slabs, Sidewalks and Driveways
All of these that are either filled with soil or on the soil must have the soil adjacent to the foundation treated to control infestations. Treatment may be carried out by drilling through the concrete or tunneling under the concrete next to the foundation wall. No untreated soil should come in contact with any wooden portion of the structure. Holes should be drilled 12 to 18 inches apart, but in some soils 30 to 36 inches is not uncommon. Thorough treatment of the soil along the
foundation is the goal.
Crawl-Space Houses
Buildings with crawl spaces usually can be treated easily and effectively. In general, the following procedures can be used. Dig trenches 6 to 8 inches wide adjacent to and around all piers and along both the inside and outside of all foundation walls. For poured concrete foundations, the trench need be only 3 to 4 inches deep. For brick and hollow block masonry foundations, it should be at least 12 inches deep. Where the footing is more than 12 inches deep, make crowbar, pipe or rod holes about 1 foot apart and extend them from the bottom of the trench to the footing. This will prevent termites from gaining hidden entry to the building through voids in these types of foundations. The trench should not be dug below the foundation. Rods shorter than the normal (3- or 4-foot) can be used. Cover treated soil with a layer of untreated soil or another suitable barrier such as polyethylene sheeting.
Piers, chimney bases and utility entrances should also be treated. Treatment at the label rate for each 10 linear feet for each foot of depth will soak the soil for thorough coverage. If the trench is deep, apply the chemical to alternate layers of soil, each about 6 inches thick. Do not make overall broadcast applications in crawl spaces of existing structures.
Basement Houses
Where footings are greater than 1 foot of depth from the grade to the bottom of the foundation, application can be made by trenching or rodding or both at the suggested rate of emulsion for each 10 linear feet per foot of depth. Treat along the outside of foundation walls and, if necessary, beneath the basement floor along the inside of foundation walls as well as along interior load-bearing walls, conduits and piers.
Foundations with Holes, Cracks, Voids or of Stone or Rubble
Stone and rubble foundations, found mainly in older structures, are particularly susceptible to termite attack primarily because of gaps between the stones. The gaps may never have been filled with mortar or the mortar may have deteriorated. Termites can exploit these gaps and tunnel within the wall. A second hazard often associated with these foundations is that the floor joists may be close to the fill, as in the crawl space, or embedded in the foundation. A third condition that an applicator may find is a porch or crawl space without ventilation, which results in damp soil and an ideal hidden location for tubes being built up from the soil to the joists.
Mechanical Alterations
Mechanical alterations may consist of several important repairs. Use mortar to seal gaps between the stones. This sealing operation may go as far as completely facing the wall. Build an access door to inaccessible areas. Install ventilation louvers. Remove soil if it is too close to joists. If there is structural damage, use treated wood when making repairs.
Termiticide Treatments
Interior (soil under the floor) and exterior termiticide application down to the footing is essential. When conducting soil treatments on the exterior, you must be careful that the foundation will not allow seepage into the structure. If you are not confident the foundation will hold the termiticide, do not rod or flood a trench. Trenching, treating the excavated soil and then shoveling the treated backfill into the trench will lower the risk of chemical seepage into critical areas of the structure. Even so, an assistant should be inside looking for leaks during the application. Rodding at the bottom of the trench may be necessary to reach the footing; however, inject the termiticide under low pressure. Treating foundations and wall voids is not recommended as it may lead directly to seepage.
Multiple Brick, Concrete Blocks, Hollow Tile, Etc.
All of these are common and must be horizontally drilled. Holes must be placed in the mortar joints to obtain necessary chemical penetration. Brick foundations that are at least two bricks thick have headers – bricks laid at right angles periodically – that can stop the flow of a termiticide. Basement construction of multiplebrick foundations should be treated below grade level from the inside and above grade level from the outside. Holes placed every 16 inches at the end of every two stretchers – bricks laid with the 8-inch side out – are adequate. It may be necessary to treat each section of the foundation under conditions such as heavy infestation, moisture problems or construction features.
The voids in hollow-tile walls run horizontally, so a chemical treatment cannot reach below the point where you treat. Do not drill through the tile directly, for it is easily cracked. A thorough grade-level pesticide application to obtain good soil coverage on both sides of the foundation (i.e., where there is a crawl space) is one of the best methods of treatment. This is also true for fieldstone foundations. Little can be done to treat voids, so complete treatment of the soil is of the utmost importance. Fieldstone foundations must be patched and all cracks and voids must be filled before treatment; still, the soil must be removed, treated on a tarp and then backfilled into the trench.


